Rainwater Harvesting
What is Rainwater Harvesting?
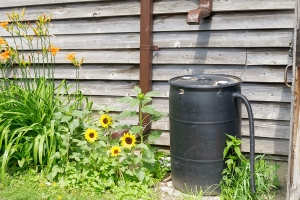
Rainwater harvesting is an ancient practice of catching and holding rain for later use. In a rainwater harvesting system, rain is gathered from a building rooftop or other source and is held in large containers for future use, such as watering gardens or washing cars. This practice reduces the demand on water resources and is excellent during times of drought.
Why is it Important?
In addition to reducing the demand on our water sources (especially important during drought), rainwater harvesting also helps prevent water pollution. Surprised?
Here’s why: the success of the 1972 Clean Water Act has meant that the greatest threat to Salt Lake’s waterbodies comes not from industrial sources, but rather through the small actions we all make in our daily lives. For example, in a rain storm, the oil, pesticides, animal waste, and litter from our lawns, sidewalks, driveways, and streets are washed down into our sewers. This is called non-point source (NPS) pollution because the pollutants come from too many sources to be identified. Rainwater harvesting diverts water from becoming polluted stormwater; instead, this captured rainwater may be used to irrigate gardens near where it falls.
Frequently Asked Questions
Q: Is your barrel or cistern connected to your drip system?
No. Our drip system requires more water pressure than a simple barrel or above-ground cistern could provide with gravity alone. Even if a pump were used to increase the pressure, the cistern does not hold enough water. Instead, we use the cisterns in our garden for hand-watering, which is necessary to supplement the drip system during the first couple of weeks after planting a new crop. Hand watering can be accomplished by filling up watering cans, or attaching a hose. (As long as the water level in the cistern is above the level of the hose, water will continue to flow out of the cistern.)
Q: Can you really fill that huge cistern with the rainfall in Utah?
Yes! You may be surprised at the amount of water that can add up from one inch of rain! One inch of water falling on 1500 square feet is 935 gallons of water! No rainwater harvesting system will catch 100 percent of the rain that falls on a rooftop; an 80% rate of efficiency is standard. From March through October, Salt Lake City receives an average rainfall of 11 inches. So that means that in an average year, the cistern can be filled at least 7 times over the course of the growing season.
Q: Do you collect snowmelt in the winter?
No, for the most part. Our cistern is not freeze-proof, so we drain it at the end of October and divert snowmelt away during the coldest months. In March or April it goes back "online."
Q: What about debris (leaves, gravel, sticks) that get washed into the harvesting system?
The downspouts don't have any grates or sieves because they would get clogged up too quickly. Once a year, when the cistern is still empty, we jump down the manhole (or personhole) of the cistern and shovel out any accumulated debris.
Q: What about algae growth inside the cistern?
Algae requires light to grow, so we use an opaque cistern to store the water. This reduces the amount of algae growth. In our white (somewhat translucent) rainbarrels at the Fairpark Garden, we try to use the water up before algae starts to grow, or as a last resort you can add a few drops of chlorine.
Q: Is the water safe for plants?
Yes. We often get questions about the materials on the roof, and whether they pose a problem for water quality. Because the roof that feeds the 4th East cistern is tar and gravel, there is the issue of the presence of polycyclic aromatic hydrocarbons (PAHs) - a group of chemicals that are formed during the incomplete burning of carbon-containing fuels such as wood, coal, diesel, oil and gas, fat (e.g.,charbroiled meat), or tobacco. Most PAHs do not dissolve easily in water. They stick to solid particles and settle to the bottoms of lakes or rivers. Because there may be some amounts of PAH in the water that flows over the roof and into the cistern, it is not considered safe for drinking. However, it is still considered safe for our irrigation uses.
Trellising
Trellising Basics
One of the challenges of urban gardening is limited space. Trellising is an especially useful technique because it allows urban gardeners to utilize vertical space. Trellising vegetable plants helps to keep crops off the ground resulting in cleaner fruits that are less susceptible to rot, to certain soil born diseases and insects and to ground dwelling pests. Trellising also makes for an easier harvest and can be used to satisfy aesthetics preferences such as covering unattractive fences with flowering vines or welcoming garden visitors with a lushly arching entrance arbor.
Fruit and vegetable plants that are commonly trellised include squash, pumpkins, cucumbers, melons, gourds, beans, peas, raspberries, grapes, tomatoes, and sometimes peppers and eggplants. Gardeners also often use trellises for flowering vines or for ivy plants.
There are many trellis designs to consider. They include: teepee, A-frame, basic stake, double-armed T, square wire frame, cage, fence, branch, staked row and string, and living companion plant trellises (such as corn stalks for beans). However, you needn’t limit yourself to existing styles. Be creative, there are dozens of possible trellis designs. If creating your own, make sure they are sufficiently strong to bear the weigh of your mature plants in varied weather. Also remember to include large openings in your design for easy harvest. If you choose to use trellises, set them up in the garden before planting to avoid damaging plant roots and match the trellis with the plant. Different trellis varieties are discussed below with each respective plant type they best accommodate (this handout will focus on peas, pole beans, and tomatoes).
Trellising for Legumes (Leguminosae)
Peas - One of the first signs of spring is the pea trellis raised over the thawing soil. There are a few commonly used trellises that work well for peas: the A-frame, the staked row with wide-meshed wire, or the simple branch or stake trellis. A-Frame Trellis: Lean two wooden 4 by 5 ft. frames covered with wide-meshed wire or plastic mesh to make the letter “A” when viewed from the side (see picture below). Fasten the frames at the top with wire or hinges to stabilize the structure. Then simply sow your peas along the bottom of each frame at the desired depth and spacing.
Staked Row/Wide-Meshed Trellis: Sink 5 ft. tall stakes or poles into the ground at a depth of a 1-2 ft. and spaced every 3 ft. Pull tight and fasten the “sheet” of mesh at each stake/pole using a staple gun or wire for the length of the bed. Sow peas directly underneath and on both sides of the meshed trellis.
Branch: One of the simplest trellis structures for your peas is the discarded branch. Find branches that have 2 in. diameters and that twig out from the main limb after about 1 ½ ft.—sinking the limb into the soil at a depth of 1-2 ft. Sow peas at the base of the branch.
Beans - Bush beans will require no staking or trellising, so either read your seed packet to see which you have, or choose seeds according to which growth habit you are seeking for your garden. For pole (or climbing) beans, there are several popular ways to trellis: the teepee trellis, the single stake trellis, the A-frame trellis, the living corn stock trellis, and the wooden frame/vertical wire trellis. Pole bean trellises will require 8 ft. tall poles, stakes or frames. Otherwise their construction will be similar to those mentioned in the “Peas” section. Pole beans especially like simple vertical wires or poles to climb with no horizontal lines to interrupt their path. Be sure to set up the trellis before you sow your beans--after the average last frost date (once the soil temperature is over 65 degrees). Sow several seeds around each pole or stake and thin down to three when seedlings start to get larger. Keep up with picking to ensure that the plant keeps producing more beans.
Teepee: Place three poles together like a teepee and tie them together at the top with stout twine or wire (see below). The poles should be at least 8 ft. tall.
Single Stake: Drive a 9 ft. stake or pole into the soil 1-2 ft. deep and sow bean seeds directly underneath. The beans will wind naturally around the pole so no additional twine should be needed to hold the plant up.
A-Frame: Follow the same design as the pea A-frame trellis using the dimensions of 4 ft. wide and 8 ft. tall.
Corn Stalk Trellis: If using the living corn stock trellis, sow corn at least 2-3 weeks prior to sowing your beans so they’re sufficiently strong and tall to hold the beans when they begin to vine. The corn stalk will serve as a support beam for the bean plants, while the nitrogen fixing beans help to replenish the soil with nutrients that the heavy-feeding corn depletes. (This is a form of companion planting and represents two of the elements of the Three Sisters garden.) Corn should be spaced roughly a foot apart with two seeds per hole planted at a depth of 1 inch.
Frame and Wire: Follow the directions for the bean A-Frame trellis above but make only one frame. Attach each side to 9 ft. stakes, posts or poles that are sunken into the bed 1-2 ft.
Trellising for Tomatoes (Solanaceae)
Most gardeners trellis their tomatoes, particularly the vining type which are known as indeterminates. You can choose simply to let your tomatoes sprawl out on the ground, but doing so will increase the risk of damage from pests and disease and will make harvesting much more difficult. If you decide not to trellis your tomatoes, mulch well underneath the plants to keep fruit from contacting the soil or being eaten by ground pests. Many types of trellises will work for your tomatoes.
The Tomato Cage: The most common tomato trellis is the cage variety with openings large enough to harvest through. Sinking two or three additional stakes on the inside of a cage will reinforce them to the extent that a tomato laden with fruit will be held sturdily (see below). Recognize that the typical cone-shaped wire tomato cage, which is under 3' tall when sunk into the ground, is not sufficient to support most indeterminate varieties, which can reach 5 to 8' in height. If making your own cage, bend a 6 by 5 concrete reinforcement wire mesh to make a circular cage. A variant of the wire tomato cage is the wooden box cage that is essentially the same design except square instead of circular and constructed with wood instead of wire. Be sure to avoid wood treaded with toxic chemicals. Wasatch Community Gardens offers a tomato caging and trellising workshop in our teaching gardens during most years. Check out our workshop calendar to learn more!
Post and Mesh or String: Another popular trellis for tomatoes planted in rows utilizes single 5-8 ft. tall 2 in. diameter posts sunken 1-2 ft. into the ground with sheets of plastic or wire mesh (trellis netting) fastened (stapled or tied with wire or twine) to each post and spaced 4 to 5 ft. apart down the row. Cattle panels can also be used and are a reasonable investment that will last for years. Make sure the mesh has large openings (6" minimum) to make harvesting easy. If you don’t have mesh, you can tightly loop lines of twine around each post down the row in horizontal fashion every 6-12 in. up the post. This method is known as the Florida weave, and we learn/practice this method in our caging and trellising workshop. When using one row of posts and mesh/twine, you may want to gently tie main vines to the trellis with a soft twine for extra support. If you’re planting 2 rows of tomatoes down a single bed, they can be sandwiched together in between two rows of posts and mesh/twine (see below).
Basic Stake: If growing tomatoes up a single vertical stake (2 inch in diameter), prune the plants to one main stem and clip off the suckers that grow between leaf stems and the main stem. If using stakes, you’ll need to tie the main tomato vines with soft but stout twine to the stakes using a lose knot to avoid damaging the stems. Each 6 ft. tall 2 in. diameter stake should be placed 2 ft. apart and sunken 1 to 2 ft. deep (see below).
Overhead Suspension: If you have the skill and materials to build a frame over your tomato bed, you can trellis indeterminate tomato vines up a string hung from an overhead support (see sketch "E" below). Wood, PVC pipe, and metal electrical conduit are all possible materials for the frame. This is the method that is used at the Green Phoenix Farm at Wasatch Community Gardens, where we grow hundreds of tomato plants each year.
Trellising for Cucurbits (Cucurbitaceae)—Melons, Squash, Gourds, Pumpkins and Cucumbers
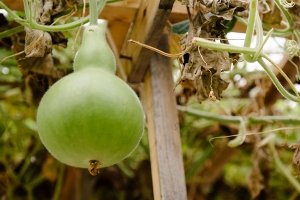
Most melons, squash, gourds, cucumbers and pumpkins take up a lot of space, as they tend to vine and sprawl out vigorously in the garden. Most cucurbits can be grown vertically to save space; however, summer squash do not have climbing tendrils, so training them to grow vertically requires extra effort and some special techniques. Teepees, A-Frames, and fences do well for cucurbits; however, most trellis designs will accommodate these opportunistic plants (follow building directions under the other sections and see pictures below). Varieties of winter squash and pumpkins that will weigh over 10 to 12 pounds at maturity may be better left to sprawl on the ground because of the strain they will put on a trellis.
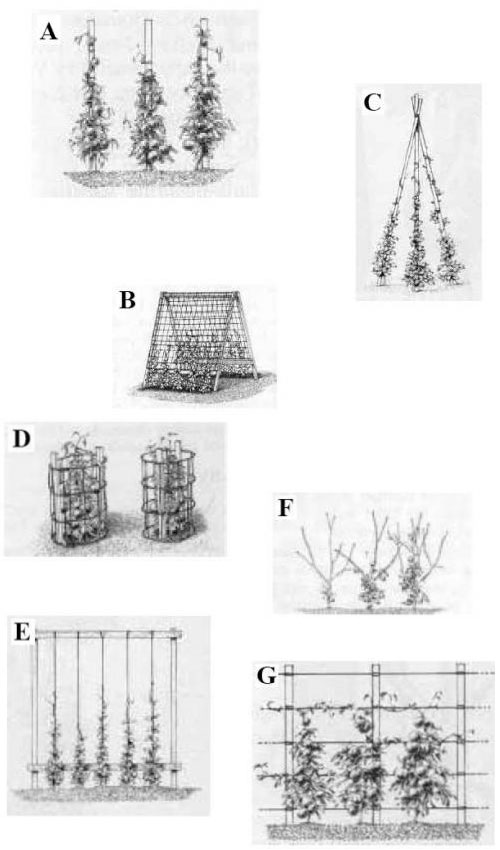
A- Basic Stake
B- A-Frame
C- Teepee
D- Cages
E- Frame &Wire
F- Branch Trellis
G- Post & Wire Row